

Endpoint for Azure Logic Apps
We talked about Azure Logic Apps before in a previous blog, where we triggered it based on time but there are multiple triggers possible. Let's look at the Request Trigger.
A Request is something you might know from APIs: it is a https endpoint to which you can send a message and receive a specific response in return. Such a request can be handled by the Request Trigger in Azure Logic Apps.
In this example, I will make a simple API with Azure Logic Apps from which we can call sales results per sales person based on their Username. For this I'm using an Azure SQL Database with the preload AdventureWorksLT data. If you want to follow this example please make sure you have it as well.
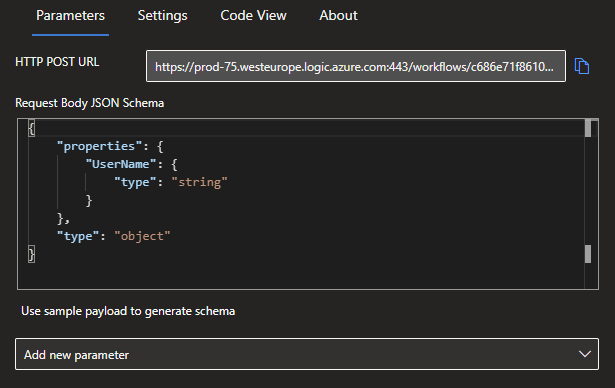
When adding a Request trigger choose the option called When a HTTP request is received. It is important to already hit save once. This will make sure that Logic App generates the Endpoint URL for your API.
Click on the Use sample payload to generate schema and you can use the following code from which you can generate the schema:
{
      "UserName": "linda3"
}
If you want to write the Json yourself and validate it, you could use a tool like this one.
It is also possible to add a new parameter for the Method, such as GET, PUT, POST, PATCH, and DELETE. A Logic app does have a minor inconvenience, which is that it can only do one single operation at a time instead of multiple.
Not to worry, with some creative uses, this can still work, but that will be for another time.
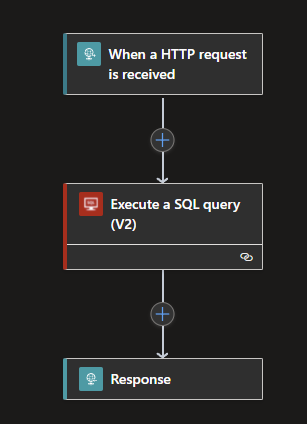
After adding your Request Trigger and an SQL Server Action such as Execute an SQL Query V2, first setup a connection with your Azure SQL Server and Database via your preferred method of logging in. After this, I used the following query:
SELECT PurchaseOrderNumber, TotalDue FROM [SalesLT].[SalesOrderHeader] AS SOH INNER JOIN [SalesLT].[Customer] AS C ON SOH.CustomerID = C.CustomerID WHERE SalesPerson = 'adventure-works\@{triggerBody()?['UserName']}'
The query will gather the PurchaseOrders and their Amounts from the Database per SalesPerson, which we will send to our Endpoint.

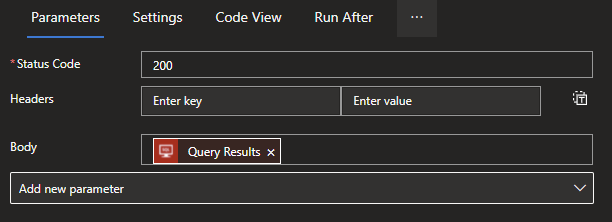
Last but not least, we need to define a Response, in which we send our results from the query to the requester. For this you can add a Response Action, which you also find under the Request category. By default, the Response Action will be on code 200, which means OK but if you want to make it conditional and add multiple response option you can do so with a Switch Action. If you want to know more about response codes you can check here.
Click on the field next to Body and select Query Results from the pop-up menu.
Hit Save again and you Sales per SalesPerson API is done!
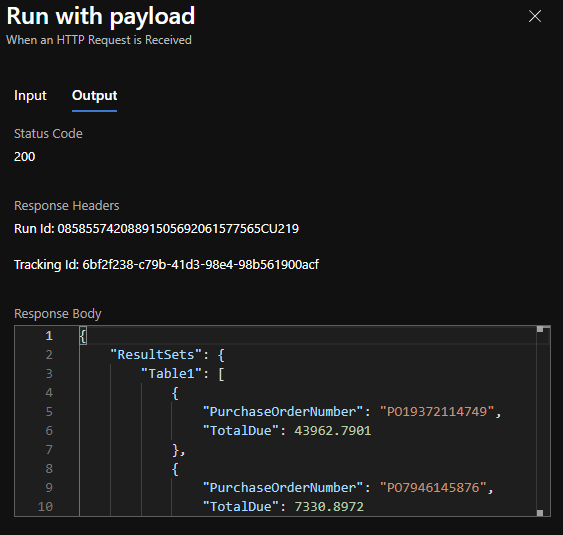
Now we can test it by clicking the Run Trigger button and selecting Run with Payload. Paste the following code and run it.
{
      "UserName": "linda3"
}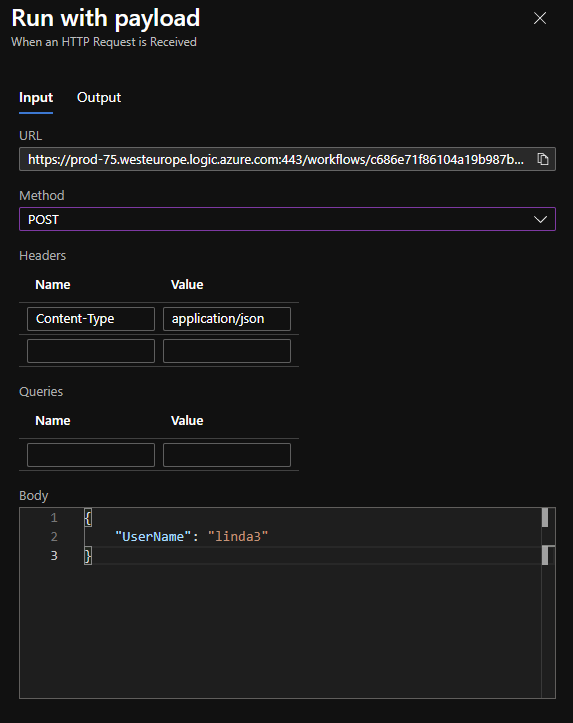
You should get results similar to mine, as shown below. While this example was pretty straightforward, it offers a platform to expand upon and use for all different kinds of cases.
What's next?
I don't know yet, we've hit some busy times before the holidays. Stay tuned and come back next week!