Observation
While working for a customer I got the question about Bulk Inserts from an Azure Storage account to an Azure SQL database. While this shouldn’t be rocket science, it was quite tedious because of the private networking that was happening within the subscription.
While the Azure Data Factory is a perfect solution of this, certainly if it has to happen often instead of a single time, it needed to work like this.
So let’s look at how to get this done. Check part 2 next week to learn how to do this in Azure Data Factory.
Settings and configuration
To show how to get this done I used the same services as were present in the case about which I got the question. Let's go through them step by step.
Azure Virtual Network and Subnet
While this is an obvious one when you want to make your network is private within Azure, you need to have a VNet and a Subnet to make this happen. If you want to follow this example, make sure you create this first, so all other services can be configured with it. It doesn't need any special settings, so the default will do.
Azure SQL Server and Database
The Azure SQL Server and Azure SQL Database require some specific configuration in order to get them to work properly. Let's look at these settings that need some configuration from the Azure portal.
Choose a simple Azure SQL database and Azure SQL Server under which the database will run. Give them a proper name and continue to the Networking tab.
Here we want to switch Private endpoint on and click on +Add private endpoint.
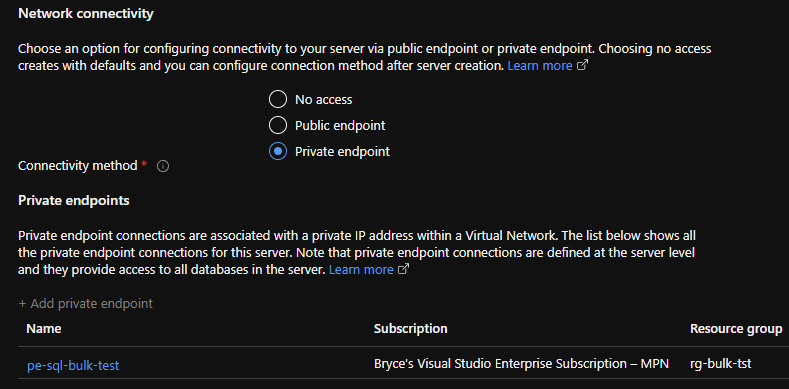
Configure the private endpoint with the virtual network and subnet that you have created and let the private DNS do its thing.
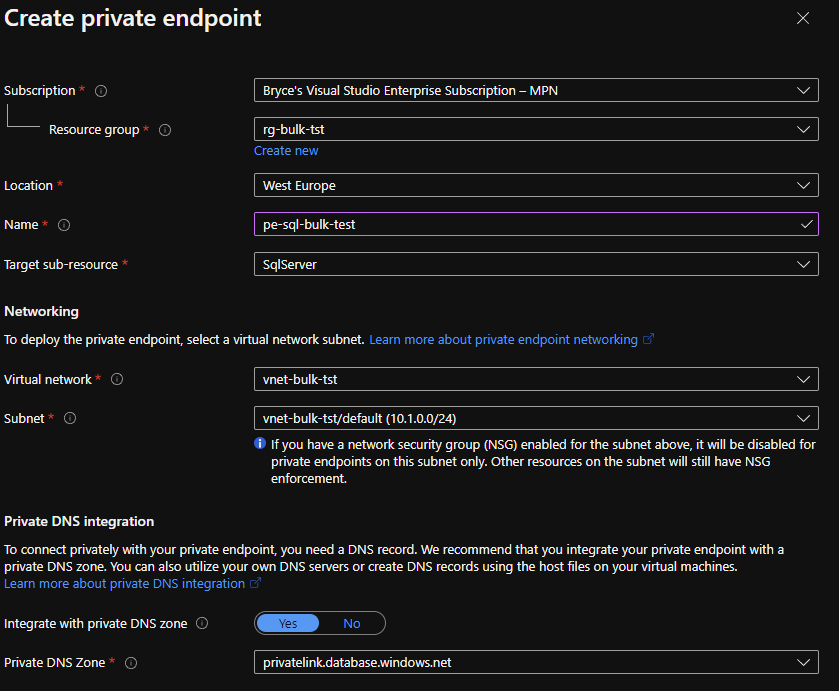
Don't forget to press OK to finalize the configuration of your private endpoint. Since we want to do this in an easy way instead of working with all kinds of tokens and passwords we are going to use a Managed Identity (MSI).
Go to the Security Tab and click on Configure identities.

At Status select ON.

This will generate an Identity (Azure Active Directory Object) for the Azure SQL Server, which we can use later within the process.
Continue finalizing and start deploying the Azure SQL Server with its database.
NOTE: If you forget steps or already have a Azure SQL Server and Database, these can also be done afterwards. Private Endpoint: Azure SQL Server > Private endpoint connections > +Private endpoint. Managed Identity: Azure SQL Server > Identity.
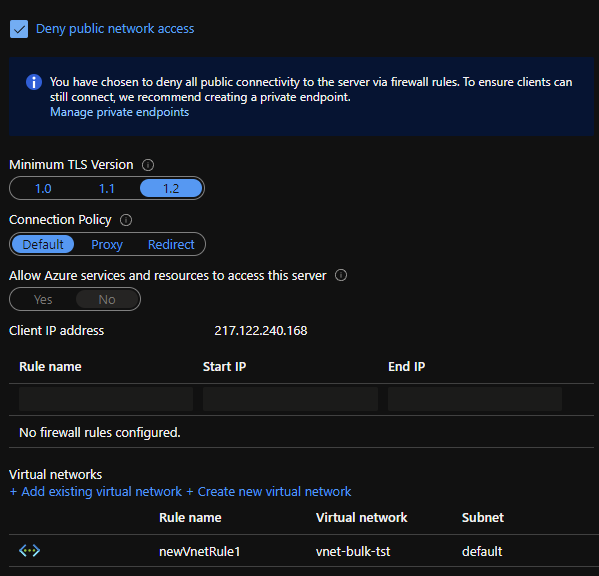
We now have to apply some settings which we couldn't add during creation. To do this, click on your Azure SQL Server and go to the Firewalls and virtual networks tab. Check the box with Deny public network access and continue by adding a virtual network by clicking on the Add existing virtual network and choose the VNet which was created earlier.
Don't forget to this the Save icon to finalize. With these steps you Azure SQL Server and Database are completely private and can only be access from with the VNet itself.
Azure Storage Account
For the Azure Storage Account we basically need to do the same as for the Azure SQL Server and database. Give it a proper name and continue to the Networking Tab. Again, we want to switch Private endpoint on and click on +Add private endpoint.
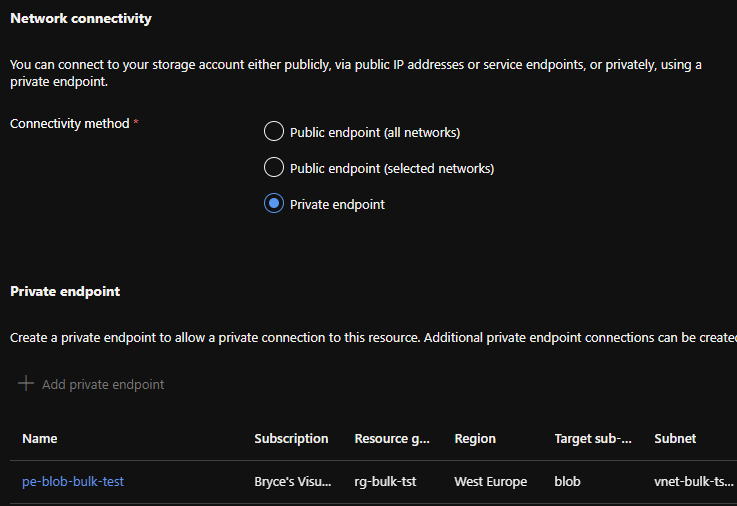
Configure it again and press OK.

Continue finalizing and start deploying the Azure Storage Account.
NOTE: If you forget steps or already have a Azure Storage Account, this can also be done afterwards. Private Endpoint: Azure Storage Account > Networking > Private endpoint connections > +Private endpoint.
Before we finish our configuration, go to your Azure Storage Account and to the Containers tab and click on +Container. Add a new container called test. Click on the test (it is possible you will get a request denied error) and go to the Properties Tab, from here copy the URL for later use. (Example: https://stbulkblob.blob.core.windows.net/test).
Now it is time to create our .CSV file, you can use the table below as input. Column names are not needed.
| Graphic cards | 10 |
| Processors | 5 |
| NVMe SSD | 7 |
| Power supplies | 3 |
| Memory | 8 |
| Fans | 12 |
| Case | 2 |
Save your .CSV as Products.CSV and upload it to the test container via the Upload button. Now your file should be uploaded. We can use this for our Bulk Insert.
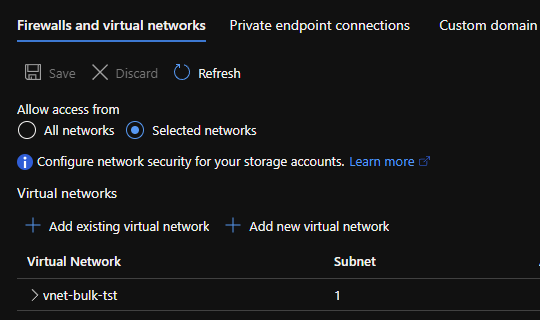
Now to do the last configurations for the Azure Storage Account, go back to the main menu of your Storage Account and go to the Networking tab. Under the Firewall and virtual network tab make sure Allow access from is set to Selected Networks and add the VNet you have created earlier to Virtual Networks by clicking on the +Add existing virtual network option.
Last but not least, we will need to give our Azure SQL Server access.
Go to the Access Control (IAM) tab and click on +Add and choose Add role assignment. Search for the Storage Blob Data Contributor role and select it. A small red dot will now appear behind the Members tab.
Go to the Members tab and at Assign access to, choose the Managed Identity option. Continue by clicking on +Select members and select your Azure SQL Server. Go to Review + Create and Create the Role.

After this you are done with your Azure Storage Account.
Azure Virtual Machine
Since all the services are behind closed walls of our VNet and private endpoints, we do need a way to access them when applying our SQL code. To do this, we need a workstation, or in this case an Azure Virtual Machine (VM).
The creation can be pretty straightforward. Create a windows 10 pro VM with RDP enabled for now. The basic settings of 2 Vcpus and 4GB memory should be fine for now. Give it a proper name and choose a login. Make sure that in the Networking tab, the VM uses the same VNet as all other services and you are good to go.
When the VM is ready, go to it and click on the Connect button and choose RDP. If you are on a Mac make sure you have the Microsoft RDP Software installed from the Appstore.
Login to your VM via the RDP client you just downloaded, finish the initial setup and download SQL Server Management Studio (SSMS) on it.
When SSMS is installed and opened, click on the Plug icon to connect to your Azure SQL Server. Fill in your Azure SQL Server name (example: {name}.database.windows.net) and use the Login which you created when creating your SQL Server.
You should now be logged in! Let's continue with the SQL part. NOTE: Do make sure you are not on the Master database but on the one you named yourself.
The SQL part
It is time for the final stretch to be able to do the Bulk Insert from our storage account. First up, we will be creating a table in which our data from the products.csv file can land in. The following SQL code will just do that:
CREATE TABLE [dbo].[products](
    [products] [nvarchar](32) NULL,
    [amounts] [int] NULL
) ON [PRIMARY]
GO
After the table is there we can create the required Credentials and Datasource. The following code will just do that, but use the URL from your Azure Storage Account container you copied earlier.
CREATE DATABASE SCOPED CREDENTIAL MyCredential WITH IDENTITY = 'Managed Identity'
GO

CREATE EXTERNAL DATA SOURCE [MyDataSource]
WITH (
TYPE = BLOB_STORAGE, LOCATION = 'https://stbulkblob.blob.core.windows.net/test', CREDENTIAL = MyCredential
);
GO
Now we can run the final SQL code manually. NOTE: depending on language settings and how you made your .CSV the FIELDTERMINATOR could also be a ' , ' or something else.
BULK INSERT [dbo].[products]
FROM 'products.csv'
WITH (DATA_SOURCE = 'MyDataSource',FORMAT = 'CSV', FIELDTERMINATOR = ';')
Seven products should be have been added to the dbo.products table and the Bulk Insert within a private network has been completed.
What’s next?
It’s the day before Christmas and while I’m going to enjoy the holidays, I'll show you how to do the same but then via the Azure Data Factory next week. Merry Christmas to all readers!

