Getting started
As the title of the blog suggests, I will show you how to connect your Ubiquiti network at your (home) office to your private network within Azure. This allows you and the users on your network to access services which are normally shielded from the internet due to their private endpoints in a Virtual Network (VNet). This becomes very handy when you need to be on the same network to, for example, access a Database or an in-house application.
Let's look what we need in to configure in Azure for this.
Networking in Azure
In order to connect your Ubiquiti network to Azure you will need 3 Azure networking services to make this possible, let's check these services and what settings are required to be able to setup the connection.
Virtual Network
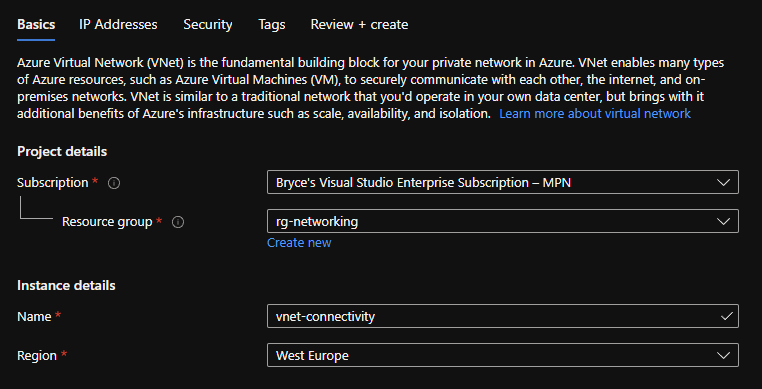
Create a simple VNet via the Azure portal or your favourite Infra as code way. For this example, I'll show the options from the portal side. Change the default IP address range if needed as well as adding subnets. Add security if required, but do know that Bastion, DDoS Protection, and Azure Firewall can become very expensive, very quickly.

Virtual Network Gateway
The Virtual Network Gateway (VPN) is the VPN device in your VNet to which a site-to-site VPN connection can be established. This can also be used for a VNet-to-VNet connection, but that is something I wouldn't be using it for in this example.
Just as with the VNet, create it in your way. Make sure you give it a proper name, choose for the VPN option at Gateway type and make sure that the VPN type is set to Route-based.
For the SKU I chose the cheapest one, which is Basic, and I connected it to the earlier-created Virtual network. The VPN will create its own subnet within your VNet to use.
Give a proper name to your Public IP address and keep the rest on Disabled, since enabling it will result in choosing a different SKU.

Local Network Gateway
The Local Network Gateway is a representation of your local network, which is used for the site-to-site connection.
When creating the Local Network Gateway, make sure you give it a proper name, add your public IP address from your (home) office network, and don't forget the address space of your network.
The address spaces are most likely one of the options below:


Setting up the connection from Azure
Now that all three services have been configured, we can do the last step within Azure, which is to configure a Connection with the VPN.
Go to your Virtual Network Gateway and choose the Connections Tab. Continue by clicking on the +Add button to add a new Connection.
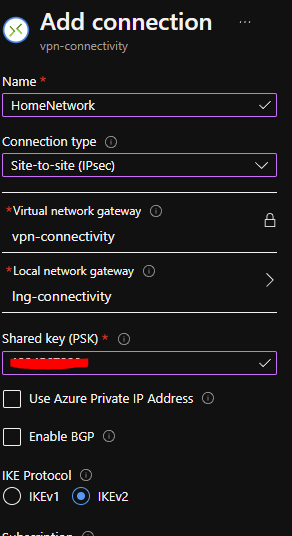
Give it a proper name, select the Site-to-Site (IPsec) option at Connection type. Make sure the Virtual Network Gateway and the Local Network Gateway are the ones you created earlier.
Add a Shared Key, which can consist of numbers and letters, and you should be good to go!

Configuring the connection in Ubiquiti
The final step will be to configure your own local network to enable the site-to-site VPN. To do this, access your Unifi Controller.
When logged in, go Settings and continue to go to the Networks Tab and click on + CREATE NEW NETWORK.
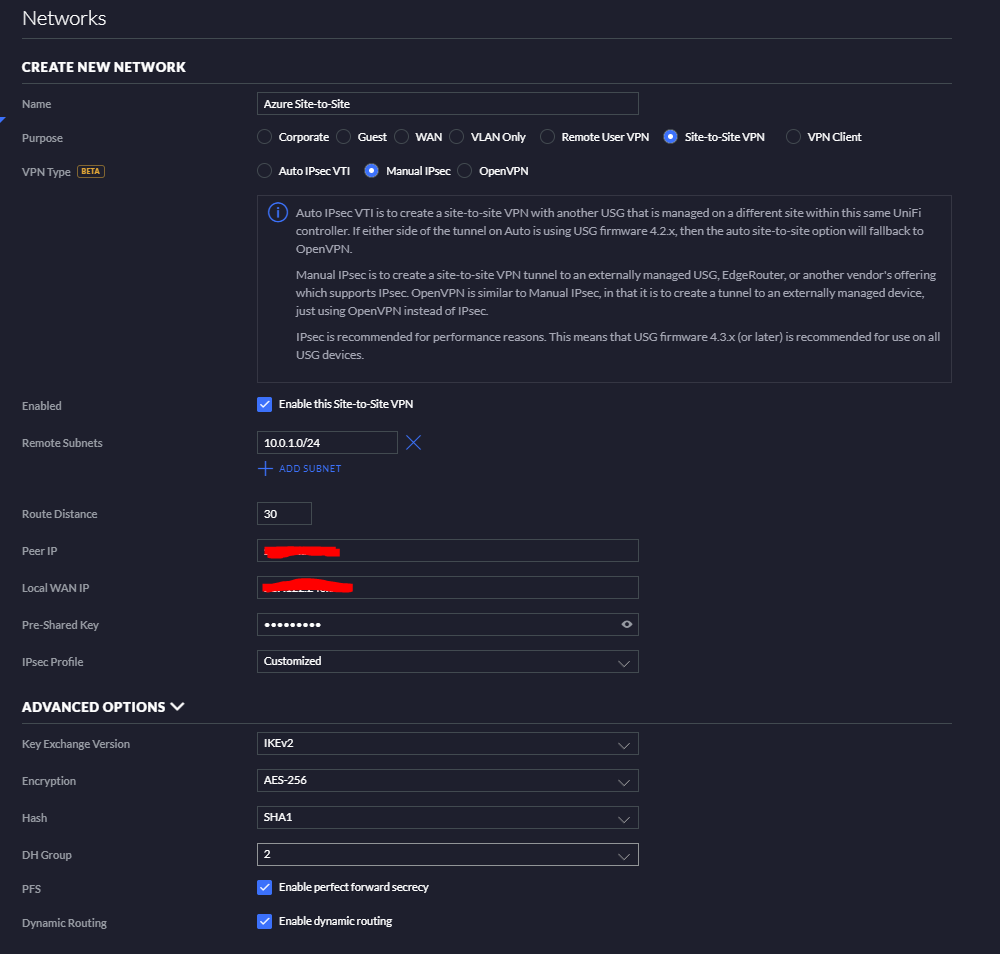
Again, give it a proper name. Purpose should be set to Site-to-Site VPN, VPN Type to Manual IPsec.
At Remote Subnets, add the Azure VNet Address space. Add your Public IP address from your Azure Virtual Network Gateway at Peer IP. Do the same for Local WAN IP, but this should be your local Public IP address.
Add your Shared Key in the Pre-Shared Key box and keep the IPsec Profile on Customised.
Open the Advanced Options and change the Key Exchange version to IKEv2, the Encryption to AES-256, and keep the Hash on SHA1 and the set the DH Group to 2.
Don't forget to hit Save!

After a few minutes the Site-to-Site VPN connection should be established!

You can now access your private services within Azure, such as databases, Virtual Machines, or others.
What's next?
In one of the first blogs, I made a boilerplate for an Azure Landing zone. Here in the Netherlands, we can go to the office more and more, and whiteboard brainstorm sessions are also occurring more and more. I made some handy things for this, stay tuned for next week's blog!

