

Previously
In my previous blog I talked about how to retrieve all the Access Control Lists (ACL) access rights with Azure Logic Apps, from your Azure Data Lake. While it is a good check to see who has access to what, it would also be nice if we could automate granting access to ACLs in order to remove the need for doing it manually.
In this blog, let's see how we can automate granting access rights to a specific path as well as all the above folders/directories with Azure Logic Apps.
I will be using methods from other previous blogs on how to grant the MSI of the Logic App access to the Microsoft Graph as well as the Data Lake itself. Make sure you apply these after creating your Azure Logic App.
Let's look, step by step, at how to automate the access rights!
The Logic App
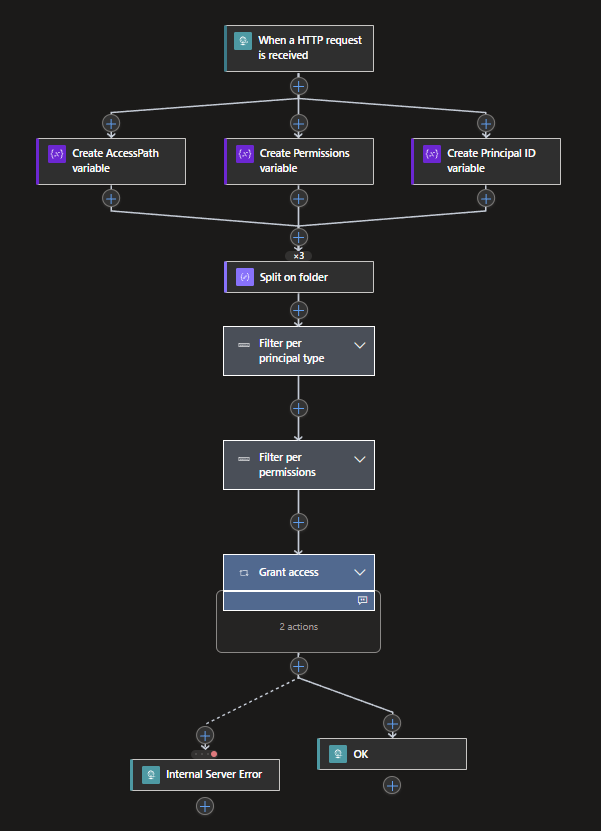
To start off, let me show you an overview of the whole Logic App. As you can see in the image below, we will be starting with an HTTP request trigger, which needs to contain the values to properly add the ACL access. Furthermore, we will be defining all folders/directories based on the supplied path and conditionally look at the Principal type and Permissions property, before we are going to apply the access itself.
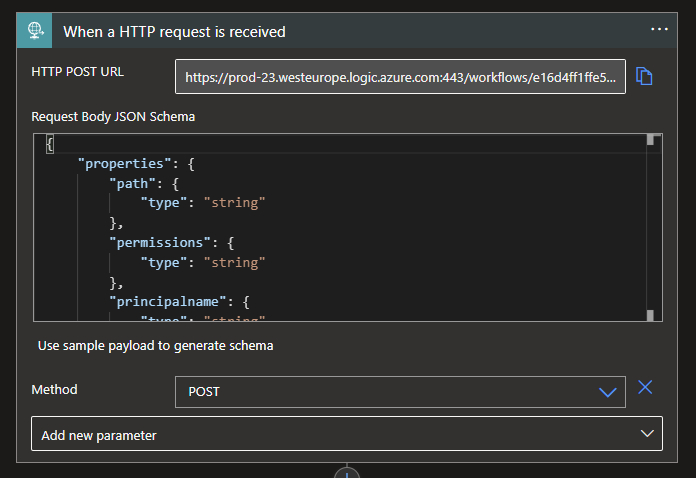
To start with, you can add the trigger by looking for the Request connector and choosing the When a HTTP request is received trigger. When added, it will not have an Endpoint right away, this will be generated when you Save your Logic App for the first time.
By clicking on the Add new parameter, check the Method box and select the POST option. This will allow us to send a change to the Logic App, in our case adding new access rights.
Furthermore, the trigger will need a Request Body containing the structure and values we will need to successfully run the Logic App. You can use the code below for your trigger:
{
    "properties": {
        "path": {
            "type": "string"
        },
        "permissions": {
            "type": "string"
        },
        "principalname": {
            "type": "string"
        },
        "principaltype": {
            "type": "string"
        }
    },
    "required": [
        "principaltype",
        "principalname",
        "permissions",
        "path"
    ],
    "type": "object"
}
To give an example of a payload of what the Logic App will expect, the JSON would look like this:
{
"path": "raw/europe/finance/exact/invoices",
"principalname": "G-EU-FINANCE-CONTRIBUTORS",
"principaltype": "group",
"permissions": "read",
}
After defining the trigger, we will be needing three variables in the Logic App. These 3 variables can all be String variables, can run in parallel and can be found under the variables connector. The AccessPath variable will be used to contain each folder/directory path based on the supplied path. The Permissions will be used to make a translation for the supplied Permissions. This might sound like you're doing things twice, but it will become more clear later on.
The PrincipalID variable will be used to add the Active Directory Object ID to for which we need to grant access.

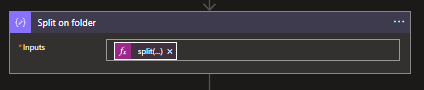
After the variables, we will start with the actual logic and need to do so by splitting the path we receive from the request. Look for the Data Operations connector and select the Compose action. The following dynamic expression can de used:
split(triggerBody()['path'],'/')This will result in an array of your path, something similar to: ["raw","europe","finance","exact","invoices"]
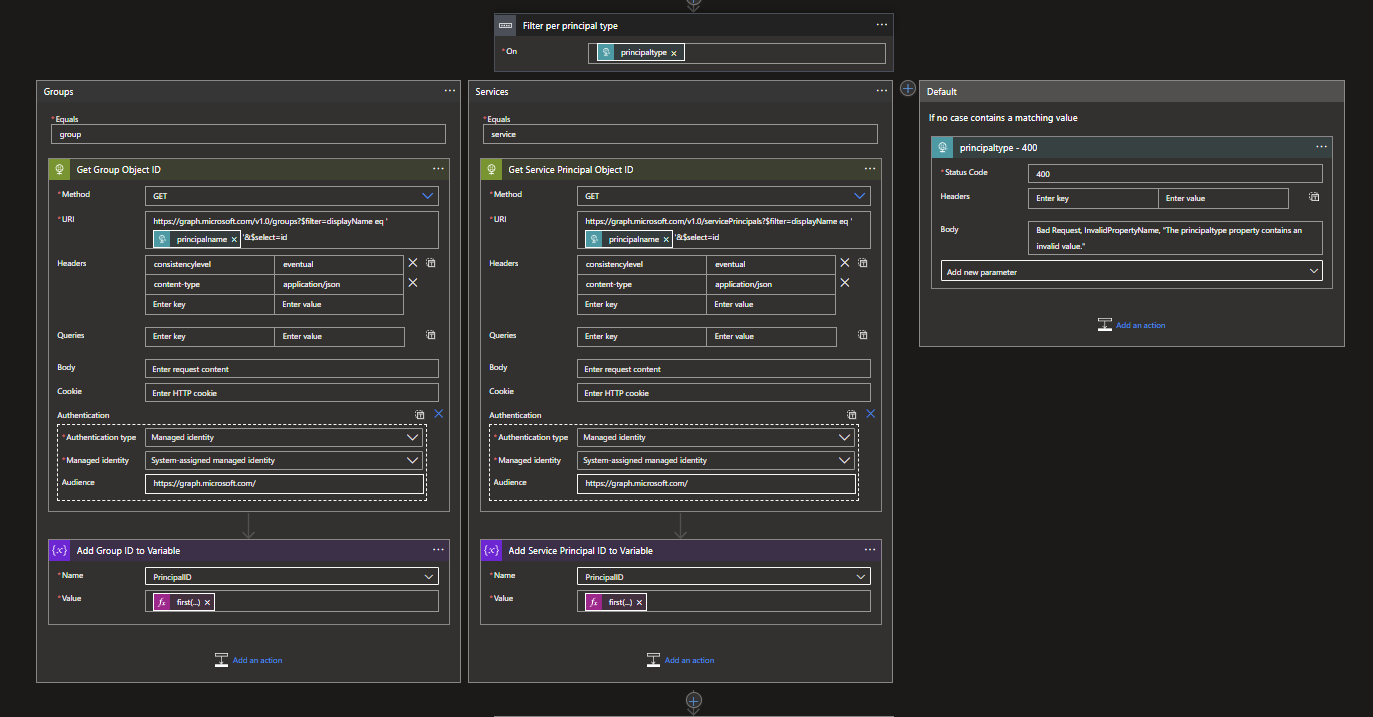
After splitting we will need to do some searching for the proper Object IDs, since these IDs are not very friendly in the sense of customer use, we expect a Group or Service name, which we will then convert to an Object ID within the Logic App.
Create a new action and search for the Control connector and choose the Switch action. The Switch function will need to work on a value, in this case the Principal type. For this you can use the following dynamic expression: @triggerBody()?['principaltype']
Create two cases within the switch, called Groups and Services and add the respective values to them as well (group and service). Before we continue with these two cases, add a Response action to the Default. This Default will be the general response if the supplied Principal type value does not match the cases.
Here we can add a Status code 400 with as body: Bad Request, InvalidPropertyName, "The principaltype property contains an invalid value." This will show the requester that the supplied value was invalid.
Back to the cases! Add an HTTP Request action to the Groups case with the following options:
Method: GET
URI: https://graph.microsoft.com/v1.0/groups?$filter=displayName eq '@{triggerBody()?['principalname']}'&$select=id
Headers: consistencylevel: eventual and content-type: application/json
Authentication: Managed Identity
Managed identity: System-assigned managed identity
Audience: https://graph.microsoft.com/
If you applied the Microsoft Graph access correctly, as shown in my previous blog, you will be able to retrieve the Group Object ID. This ID still needs to be parsed and therefore we will use a Set variable action, which you can find under the variables connector.
Select the PrincipalID variable and use the following dynamic expression as Value:
first(body('Get_Group_Object_ID')?['Value'])?['id']
We use the first operator in this expression, to work around the fact that the request will always result in an Array, but only containing one value.
Now that the Groups case has been configured, do the same for the Services case but use the following URI in the HTTP request: https://graph.microsoft.com/v1.0/servicePrincipals?$filter=displayName eq '@{triggerBody()?['principalname']}'&$select=id
And the following dynamic expression for the Set variable action: first(body('Get_Service_Principal_Object_ID')?['Value'])?['id']
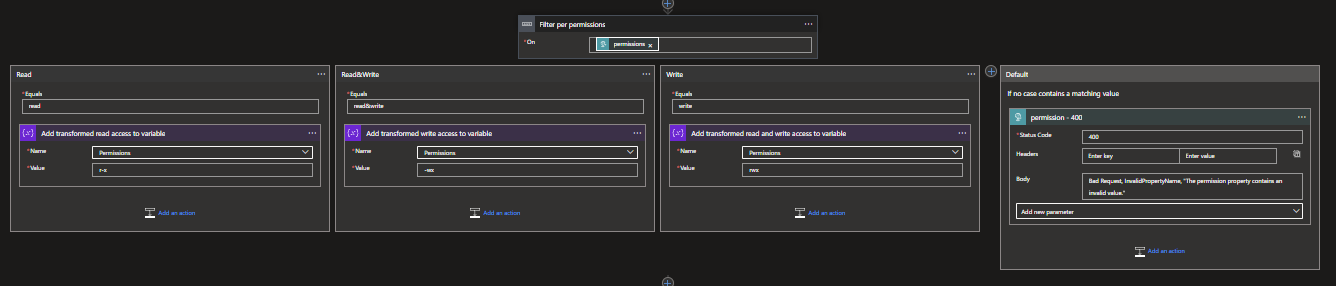
Create another Switch, this one can be based on the following: @triggerBody()?['permissions']. Add three cases, called Read, Write and Read&Write, as well as adding them as value. Add a Set variable action to each case with the following values per case:
Read: r-x
Write: -wx
Read&Write: rwx
As you might have guessed by now, the r stands for Read, the w for Write and the x for execute. Execute is needed to do any operation on the Azure Data Lake, so this is something we want by default.
Speaking of Defaults, in the default case add a Response action with as status code: 400 and as body: Bad Request, InvalidPropertyName, "The permission property contains an invalid value."
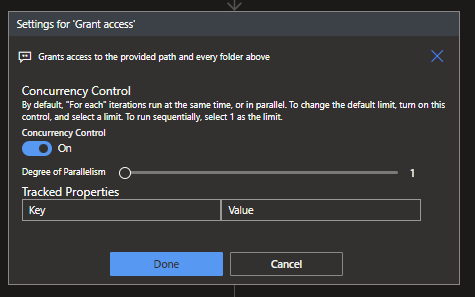
Now that the basics have been set, we can start with actually granting the access. Since we want to do this not only for the supplied path, but also for all the above folders/directories we will be needing a For Each action, which can be found under the Control connector.
The For Each will require an output to work with. For this you can use the following expression: @outputs('Split_on_folder')
Before we continue, it is of importance to change some settings on the For Each, which we can do by clicking on the 3 dots ... and choosing Settings. Change the status of Concurrency Control to ON and put the Degree of Parallelism to 1. This will allow us to work with the value supplied in the For Each.
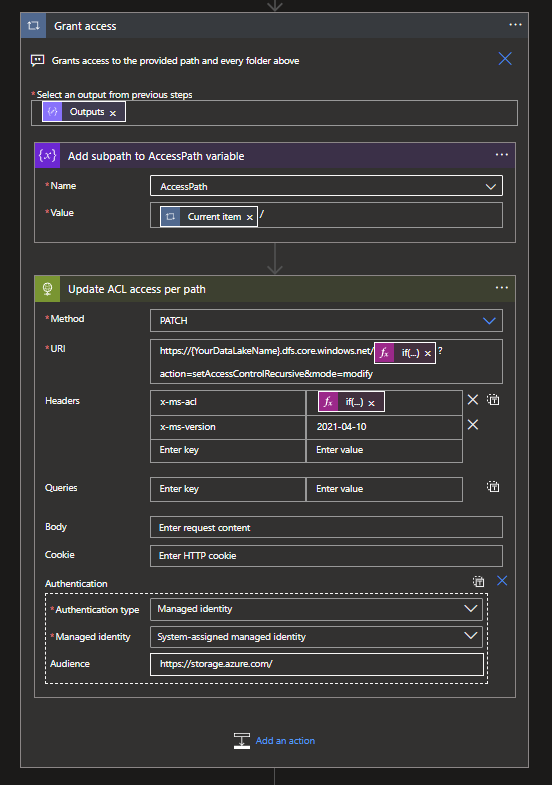
Add a Set variable action inside of the For Each and select the AccessPath variable. For the Value you can use the following expression: @{items('Grant_access')}/
This will slowly build up the path with a / behind it each time.
Now we will need to add an HTTP Request action with the following options:
Methode: PATCH
URI: https://{YourDataLakeName}.dfs.core.windows.net/@{if(lessOrEquals(sub(length(variables('AccessPath')), length(replace(variables('AccessPath'), '/', ''))),1),variables('AccessPath'),substring(variables('AccessPath'),0,sub(length(variables('AccessPath')),1)))}?action=setAccessControlRecursive&mode=modify
Headers: x-ms-acl: if(equals(triggerBody()?['path'],substring(variables('AccessPath'),0,sub(length(variables('AccessPath')),1))),if(equals(triggerBody()?['principaltype'],'group'),concat('group:',variables('PrincipalID'),':',variables('Permissions'),',default:group:',variables('PrincipalID'),':',variables('Permissions')),concat('user:',variables('PrincipalID'),':',variables('Permissions'),',default:user:',variables('PrincipalID'),':',variables('Permissions'))),if(equals(triggerBody()?['principaltype'],'group'),concat('group:',variables('PrincipalID'),':',variables('Permissions')),concat('user:',variables('PrincipalID'),':',variables('Permissions')))) and x-ms-version: 2021-04-10
Authentication: Managed Identity
Managed identity: System-assigned managed identity
Audience: https://storage.azure.com
Both the URI and the Headers contain expressions. For the URI we have to make a small edit to the variables output. This is because the path requires the container, which in this example is raw/. The container will require the / to be present, but the path itself can't end with a /. That's why we need to make it conditional in the sense that it will keep the / for the container but not for the path itself.
For the Headers it is an even more complex expression, but it checks two things. First up is whether the path we build in the For Each is the same as the Path supplied in the Request. If so, we need to add Default values as well.
For the uninitiated, ACLs know 2 types of access, custom and default. Custom allows a user, group or service (user) to have rights to that specific path, while with Default you also grant them access to all the folders/directories below.
Now we want to only grant the Default to the specific path and not all above, since this might grant too much access for the user or group.
And secondly we check if we need to grant a Group or User(Service) access. It isn't best practise to grant individual users access rights, but a service via MSI does count as a User in this case.
NOTE: change {YourDataLakeName} to the proper storage account name of your Azure Data Lake as well as keep the URI and the options as is. If the specified action in the URI ?action=setAccessControlRecursive&mode=modify is changed, it might result in the removal of ALL currently enabled access rights, therefore it is important to keep it on setAccessControlRecursive and mode=modify.
Last but not least, we will need to give our final Responses. These can go two ways. First add a Response called OK. Keep it on the status code 200 and add the following expression to the body: successfully granted @{triggerBody()?['principalname']}, @{triggerBody()?['permissions']} access to @{triggerBody()?['path']} This notifies our requester that the request has been executed successfully.
Add another Response in parallel and call this one Internal Server Error with a status code 500. In the body you can add the following: Internal Server Error, InternalError, "The server encountered an internal error. Please retry the request."
This indicates that something went wrong, and since we've already covered different Responses in the cases, it can only be the granting of the access itself.
With this our Logic App is completed! You can now connect its Endpoint to your ticket system of other workflows.

What's next?
The last couple of weeks have been about Bicep, YAMLS and Logic Apps. I have noticed that the Cloud Engineering is slowly taking over my daily routine, instead of Data Engineering. This is surely not a problem, since I only do both in the Cloud. So stay tuned for next weeks Cloud content!