

Getting started
In a previous blog, I talked about automating ACL access rights. In most companies there will be a ticket system in place, in which such access requests will be requested. Modern ticket systems allow for workflows and automation of their own, in which they can also make HTTP requests like Azure Logic Apps.
In this blog I will show you how to connect to BMCs Remedyforce (part of Salesforce) via Azure Logic Apps and how to make back to update or close tickets and tasks.
Let's have a look!
The Logic App
When the Logic App is created, we start with a When a HTTP request is received trigger, which can be found under the request connector. By clicking on the Add new parameter option, select the POST Method.
As Request body, you can use the following payload:
{
    "properties": {
        "taskid": {
            "type": "string"
        },
        "ticketid": {
            "type": "string"
        },
        "value": {
            "type": "string"
        }
    },
    "type": "object"
}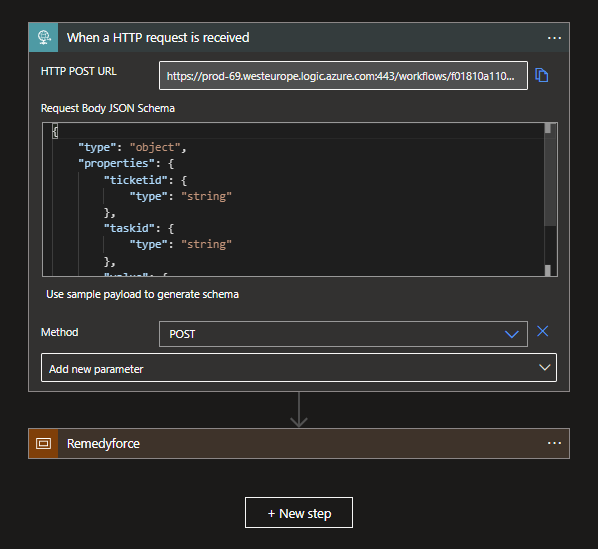
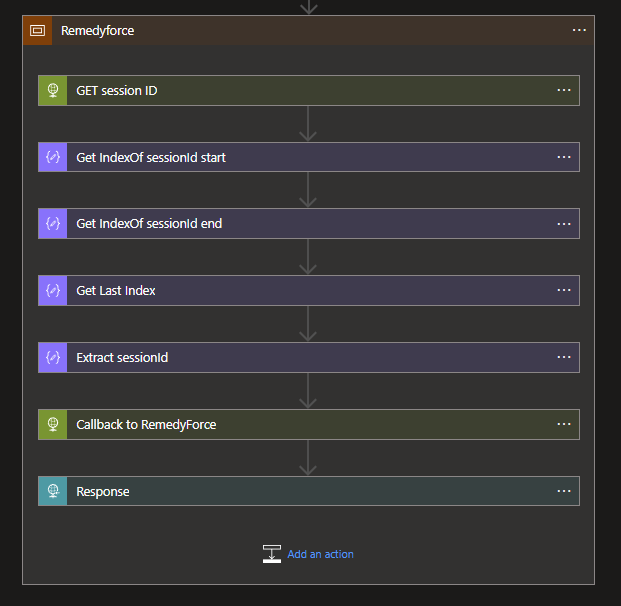
In this example I used the Scope action from the Control connector to box all the actions that are required for the connection to Remedyforce.
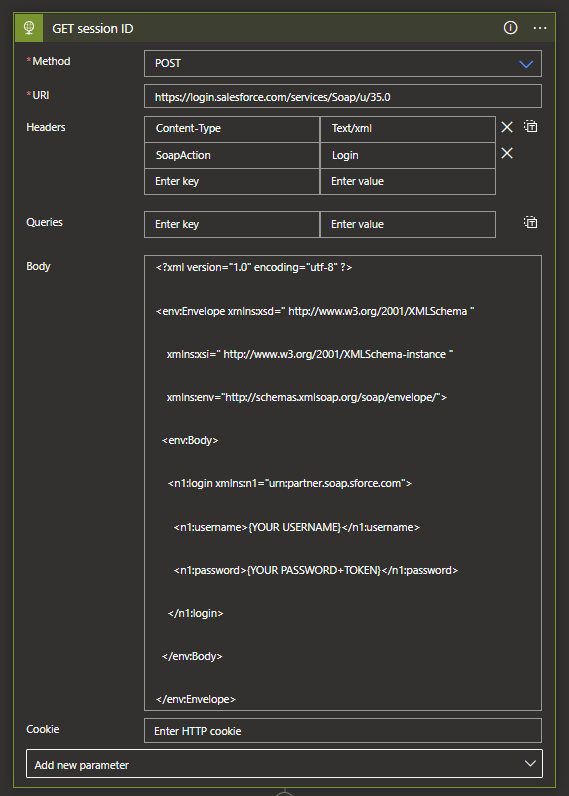
To make the connection, we first need to set up a session with Remedyforce. In order to do this we will add an HTTP Request action to the scope with the following options:
Method: POST
URI: https://login.salesforce.com/services/Soap/u/35.0
Headers: Content-Type: Text/xml and SoapAction: Login
Body:
<?xml version="1.0" encoding="utf-8" ?>

<env:Envelope xmlns:xsd=" http://www.w3.org/2001/XMLSchema "

    xmlns:xsi=" http://www.w3.org/2001/XMLSchema-instance "

    xmlns:env="http://schemas.xmlsoap.org/soap/envelope/">

  <env:Body>

    <n1:login xmlns:n1="urn:partner.soap.sforce.com">

      <n1:username>{YOUR USERNAME}</n1:username>

      <n1:password>{YOUR PASSWORD+TOKEN}</n1:password>

    </n1:login>

  </env:Body>

</env:Envelope>
Unfortunately, Salesforce only accepts an XML formatted body, which needs a Username and Password. From experience this is not just a Password, but a combination of the Password+Token.
The result of the HTTP Request will be a dirty XML as text, which makes sense, due to our Header, but again, this is also the only output allowed, using any other Content-Type will result in your Logic App running for ever. The text it self will contain a sessionID which we will need for our callbacks to Remedyforce.
Now that we got XML as text, you might think But this can be converted right? And you would be right. This requires external services or an Integration Account, though, which starts at €800,- per month. Now there is also the Dynamic Expression called xml() which would convert any valid text to XML, but as stated, the XML is dirty and is not accepted by the Expression.
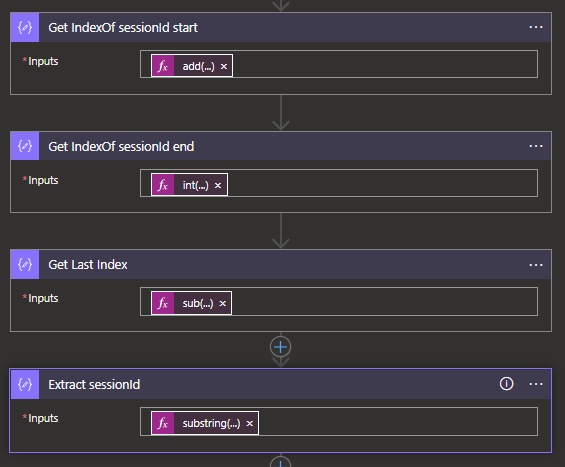
So for this, we have to do some text manipulation to get the sessionID string that we need. To make this as clear as possible and create an easy step by step overview, I did this in 4 separate steps.
To start, we will need 4 Compose actions from the Data Operations connector, all in a sequential order.
In the first one, you can use the following Dynamic Expression: add(int(indexOf(body('GET_session_ID'), '<sessionId>')), 11)
This will get the number of counted characters (Index) of the <sessionId> property, which is the <. To this we add 11, to get to the first character of the sessionId string.
In the second Compose, you can add the following Dynamic Expression: int(indexOf(body('GET_session_ID'), '</sessionId>'))
This gets the < from the </sessionId>, which indicates the end of the property value.
Up next we subtract both Index numbers to get the amount of characters we need to extract from the string, which you can do with the following: sub(outputs('Get_IndexOf_sessionId_end'),outputs('Get_IndexOf_sessionId_start'))
And last but not least, we will need to get the these characters by using a substring to retrieve the sessionId string: substring(body('GET_session_ID'),outputs('Get_IndexOf_sessionId_start'),outputs('Get_Last_Index'))
Now with the sessionID in our possession, we can start making calls back to Remedyforce.
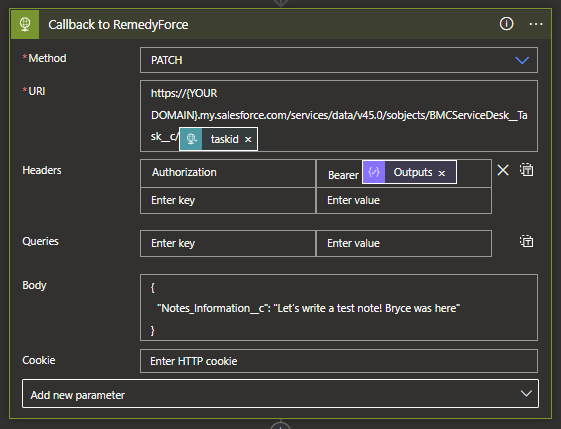
Again we will need an HTTP Request action, but with the following options:
Method: PATCH
URI: https://{YOUR DOMAIN}.my.salesforce.com/services/data/v45.0/sobjects/BMCServiceDesk__Incident__c/@{triggerBody()?['ticketid']} For Tickets, https://{YOUR DOMAIN}.my.salesforce.com/services/data/v45.0/sobjects/BMCServiceDesk__Task__c/@{triggerBody()?['taskid']} For Tasks.
Headers: Authorization: Bearer @{outputs('Extract_sessionId')}
Body: {
"Notes_Information__c": "Let’s write a test note! Bryce was here"
}
The Body will contain the fields you want to update, followed by its value. For more information about this or the different URI options check the Remedyforce API documentation.
Another important thing to remember is to add your own Remedyforce domain to the URI in order to make the request to the right place.
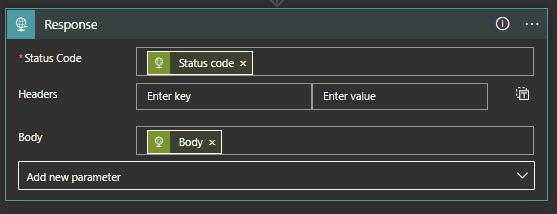
The only action left is a Response, which is required for the trigger we used. To make it easy, I used the Status Code and Body results from the previous HTTP request (Callback to Remedyforce) to fill these in. For this the following code can be used:
@{outputs('Callback_to_RemedyForce')['statusCode']} and @{body('Callback_to_RemedyForce')}
With the whole Logic App assembled, you will be able to make the updates you might need. While this is just an example, every step within the Scope can be added to other Logic Apps that contain the actual logic, such as the ACL Access Logic App from my previous blog.
What's next?
Some months ago I blogged about how to connect your Ubiquiti network to Azure. Now with my new purchase of a Synology rs1619xs+, I will show how to make backups to Azure! Stay tuned for next week's blog!