Getting started
When working on large enterprise solutions within Azure, you might deploy/ release changes quite often to production environments. Within Azure itself there is a limit of 800 deployments and starting from 700 deployments it will continuously remove the 100 oldest records, until the threshold of 700 is reached once again. For all other environments this is fine, but for production this can be an issue, especially when you need to keep deployment logs for compliancy or regulatory reasons, such as yearly audits or otherwise.
With the help of the Azure Logic App we will be building in this blog, it is easy to export these logs, save them and use them later in reports or audits.
Let's have a look!

Configuration
Before we start with creating the whole flow, we need to preform a few configurations. If you have created a blanc Logic App via the azure portal, it will time to enable the Managed Service Identity (MSI) via the Identity underneath the Settings category in the blade. Slide the slider to ON and click on Save. A new MSI will be generated which we need for the next steps.

Continue by going to the Access control (IAM) of your Resource Group. Click on the + Add button and choose the Add role assignment option.
Select the Reader role and go to the Members tab. In here choose the Assign access to: Managed Identity option and click on + Select members to search for your newly created Logic App. When selected, click on the Review + assign button twice, to assign the role to the Resource Group

Last but not least, we need to do a similar process to the Azure Data lake, but now we will set an Access Control List (ACL) instead of and Role-based role (RBAC).
Go to your Azure Data Lake (Storage Account), open the container in question, and create a folder in which you want to save your exports. When created, click on the three dots ... behind the folder and choose the Manage ACL option.
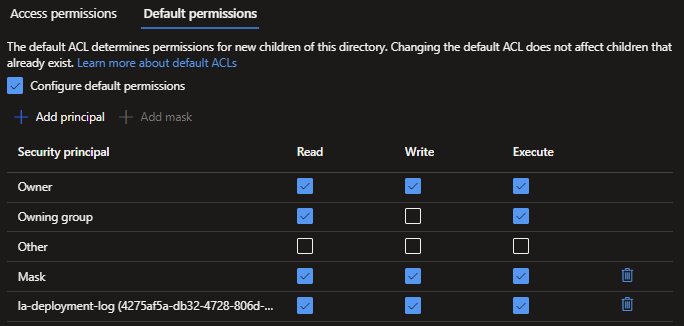
Click on + Add principal and add your Logic App, do this for both the Access permissions and the Default permissions tab. Grant the Logic App the rights you deem needed, this will need to be at least write to store the exports.

The Logic App
With all the configuration work done, we can start looking at the flow we need to setup. Luckily this is pretty straightforward and simple to setup!
Start with searching for the Schudule connector and choose the Recurrence Trigger. Set the Interval to once per day and click on the Add new parameter option to add the Time zone, At these Hourse and At these minutes parameters.
Since i'm on UTC+01, I configured it as such and want to run it at the last minute of the day (23:59), since for me, no deployments occur around midnight.

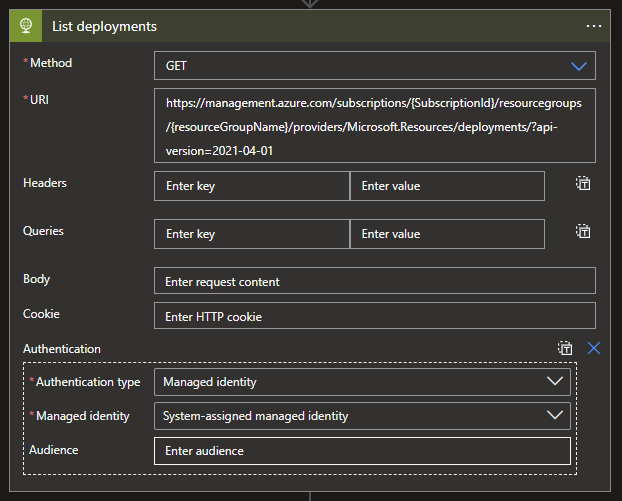
Secondly we will need our Action. Search for the HTTP Request Connector and choose the HTTP option. Use the following options:
Methode: GET
URL: https://management.azure.com/subscriptions/{SubscriptionId}/resourcegroups/{resourceGroupName}/providers/Microsoft.Resources/deployments/?api-version=2021-04-01
Add a new parameter and choose the Authentication option and select Managed Identity.
NOTE: Don't forget to add your own SubscriptionId and ResourceGroupName to the URL!
With this HTTP Request we can list all available deployments within the chosen Resource Group and with this data we can continue the process.

Now that we can retrieve all deployments, we want to filter on only the data from today, since we are running it on a daily basis. To do this we need to look for a Data Operations Connector and choose the Filter Array option.
We will need to select the Array from the HTTP request Body, this we can do with a similar code too: @body('List_deployments')?['value']
Now click on the Edit in advanced mode and use the following code:
@greaterOrEquals(item()?['properties']?['timestamp'], startOfDay(utcNow()))
Which will filter on all the data from just today.

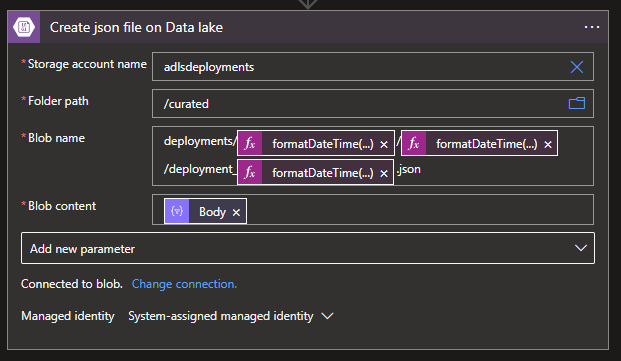
Last but not least, we will need to save our filtered data to our Data Lake. This can be done by searching for the Azure Blob Storage Connector and selecting the Create Blob option.
Select or fill-in the name of your Data lake (Storage Account), Select the folder you created earlier and add within the Blob Name the following code:
deployments/@{formatDateTime(utcNow(),'yyyy')}/@{formatDateTime(utcNow(),'MM')}/deployment_@{formatDateTime(utcNow(),'yyyyMMdd')}.json
The code will create a deployment folder, with in it a folder per year, month and a JSON file with the date in the name.
Don't forget to add the Output from the previous Filter action as the Blob Content to actually add the data to the file!

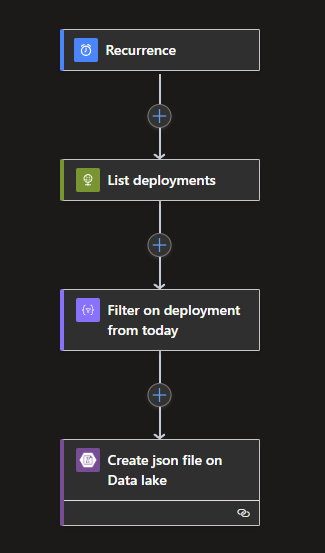
With this last step completed, your Logic App should look something like this:

And if you trigger the Logic App manually for a quick test, you should see a new file being added to your Azure Data Lake, as shown below:

With this process in place you don't have to worry about full or auto-deleting deployment logs, which makes live a bit easier when they are needed!
What’s Next?
To stay on the a similar subject of creating exports with Azure Logic Apps, let's look at log analytics workspaces and retained data. Stay tuned for next weeks blog!

